FotoboxSuite
Prepare events online and assign photo booths
Prepare events, layouts, photo booth designs and galleries in the customer portal, then select the appropriate event on multiple Windows photo booths.
FotoboxSuite connects the customer portal in your browser with the Studio app on the photo booth’s Windows computer. You can prepare events, layout selection, photo booth designs and output options in the portal before deployment. On site, the app loads the appropriate configuration and runs the camera, printing and guest interface.
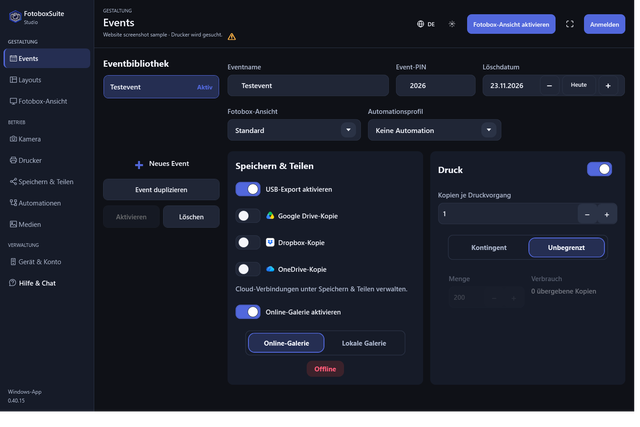
Prepare an event in the portal
- Create an event. Choose a unique name and check the event PIN, retention date and deletion date.
- Select print layouts. Prepare layouts in the library and enable the versions intended for this event.
- Assign a photo booth design. Choose a start and result screen for the event, or use the standard view.
- Set output options. Decide whether to use the online gallery, local gallery, USB export and printing. You can prepare the number of copies and a print quota.
- Choose a photo booth. Under “Devices and event assignment”, assign the active event to the intended device.
- Check synchronisation before transport. Connect the photo booth to the internet and check in the app that the event, layouts and all required images are available.
Manage multiple photo booths
Each connected photo booth has its own device entry in the customer portal. Select the active event for each device there. For example, two photo booths can run different prepared events at the same time. The number of devices you can use actively depends on your subscription.
The event library shows which devices are assigned to each event. An event can also be assigned to multiple devices. However, the camera, printer, paper and any greenscreen calibration must match the actual setup on each photo booth.
What is prepared centrally and what stays local?
| In the customer portal | On the Windows photo booth |
|---|---|
| Event details, PIN, output options and retention | Check the loaded event and actual output workflow |
| Layouts, your own design images and photo booth design | Check that images are fully loaded, then check the display and a test capture |
| Select the active event for each device | Check the camera connection, live view and capture |
| Manage printer assignments and available device settings | Configure the Windows driver, paper and local cutting settings, then make a test print |
| Prepare a greenscreen background for each layout | Calibrate the wall colour and lighting for the actual camera |
Reuse a similar event
You can duplicate an existing event. The copy includes the layout selection, photo booth design, print settings and output options. It receives its own ID, gallery access and a new event PIN. Before your next booking, check the copy’s name, assignments, date and settings.
What needs an internet connection?
Portal access, sign-in, device connection, synchronisation and the online gallery require internet access. For an event with a weak connection, sign in to the app beforehand, load the event and all files, and check the planned local workflow on the device.
A portal change reaches a disconnected photo booth only after successful synchronisation. The device overview shows the last contact to help you check this. Editing simultaneously can cause conflicts that should be resolved before deployment.
Enable guest operation
Check the event name, layout selection and assigned photo booth design on the device. Then make a test capture and, if intended, a test print. Open the QR code with a smartphone to check gallery or download access as well. You can then start photo booth mode for guests.
Online preparation saves setup work on site. The final check remains on the actual photo booth because the camera, driver, paper and network depend on the setup.